Diary of the build process - viewed through a years rose tinted hindsight.
December '96
Strip the donor - it took about ten evenings in below freezing temperatures
to reduce the Sierra to a body shell and pile of bits. Work was reluctant
to have the donor sitting in their car park, so the stripping had to take
place at home, and the interesting bits moved to the garage when possible.
I was worried about how to dispose of the body shell, but just as I had
finished stripping it out (I was dancing on the roof as I recall) a guy
with a flat bed truck drove up and took it off my hands. Of course, it
took 7 people to man handle the dead sierra onto the truck, and it stuck
over the end by around 4 feet, but I was glad to be rid of it. About 5
trips to the dump and I was free of the rest of the junk - carpets, seats
etc.
Reconditioning - most of the donor was in pretty good shape,
but the compression was down on one cylinder, so I took the top off the
engine and there was a ridge in the bore.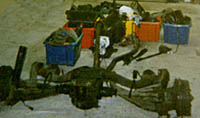 I stripped the block down and had it rebored, new pistons, bearings, seals
etc. Now perhaps I wish I'd had the block skimmed to up compression, but
at the time it seemed enough just to lap in the valves and replace the
springs etc. The rest of the donor pretty much just got cleaned up and
perhaps painted. The anti-roll bar I had powder coated.
I stripped the block down and had it rebored, new pistons, bearings, seals
etc. Now perhaps I wish I'd had the block skimmed to up compression, but
at the time it seemed enough just to lap in the valves and replace the
springs etc. The rest of the donor pretty much just got cleaned up and
perhaps painted. The anti-roll bar I had powder coated.
The photo shows pretty much how much was kept from the donor - (excluding
the engine). The wiring harness alone weighed 28 pounds. One hint at this
stage. I you scratch a plastic bath while washing your rear sub frame,
T-cut and wire wool works wonders.
Collect the kit. A scary day in Nottingham. Awake well before
first light and drive the hired Luton van to collect my two hardy volenteers.
One was my boss who was building a kit car vicariously through me. I think
the fact that it was the saturday before Christmas helped him make the
decision to get out of the house, away from the kids and putting up decorations.
By the end of the day I think he regretted the decision. The other assistant
was Phil, a hardy Welshman well suited to the rigours of standing in a
factory yard in sub-zero temperatures for hours on end.
It took us three hours at Robin Hood, mostly waiting in line along with
the 140 other people collecting kits that day, and identifying and counting
strange shaped bits of steel. The operation was reasonably well run by
RH, but the scale was difficult for them to cope with I think.
Cylinder head recondition. For several days after I collected
the kit I was away doing the "Christmas" thing with my family.
Much of this involved eating large meals, then while the elders slept
- I crept away into the garage and reground the valves and replaced the
springs on the cylinder head. That was about all I could get away with
sneaking ito their house amongst the presents.
January '97
Fettle the chassis - Once you get the kit, all the sheet steel
is rough cut, often with a plasma torch, and the edges are deadly. The
first stage is to grind or file the edges smooth. This took me about a
week - ear defenders essential, since the chassis is a large sound box
and any operations with a grinder of a file resonate badly.
At least you can lift the exmo chassis with two people, not the 7 or
more for the donor.
Bolting the chassis - I went with the stainless steel "fully
welded" chassis This still needs quite a lot of bolting - I'm guessing
several hundred for the entire build. The first wave of this involves a
bunch of 10mm bolts, slow drilling in stainless steel. The worst comes
later when the engine is in place - you need to drill through 3 (4) layers
of steel in the footwell, holding a drill at arms length while upsidedown
in the passenger compartment, the space tight enough that there is only
clearance for about 3 mm of drill bit to extend from the drill.
Rear suspension - for me this went quite well, once I had the
confidence to wave the angle grinder about with wild abandon to clearance
things. The rear sub frame, (big, heavy component from the sierra) bolts
through to 30 cm (1 foot) plates inside the car.
I was checking alignment by measuring from the front suspension mount,
and within an hour or two I was happy - aligned to within a mm.
Next comes the engine - so once this was re-built and mated to
the gearbox (and new engine mounts found - my donor had the wrong type.
Ten pounds), three of us manhandled it into the car. I have vivid
memories of clearancing some of the holes round the gearbox mount, with
the engine swaying a few inches above my nose. Of course, you have to drill
holes for mounting ancillaries before you fit the engine. Of course I drilled
them in the wrong places.
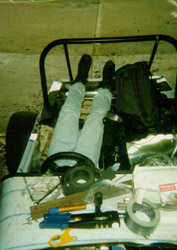
With the engine in, the engine sleds can be bolted into place (see above)
and the anti roll bar fitted along with the rest of the front suspension.
A little more lump hammer and angle grinder diplomacy is needed, but I
was getting blaze about this by now - I guess this was the end of January
- about 4 weeks after I got the kit. At least the car now rolled forwards
and backwards in a straight line.
Pedal box and steering - The build "manual" says you will need
to fabricate some brackets for the pedal box.... It isn't kidding. Tin
snips, bent iron, 8 mm studding. Val Singleton would be proud (and I'd
be interested if any Americans get that reference...). I ended up cutting
and brazing the gas pedal to shift the pedals closer together to get enough
space for my feet. It hasn't broken - yet.
Getting the steering column to fit wasn't so bad - I'd ditched
the power steering of the donor and paid 35 quid for a re-con rack from
RH. At this stage, the column support bar was just held in place with clamps,
and fitted quite well. The bushing where it passed through the firewall
was some fun - it passed through at an angle and the bushing is designed
such that it should be at 90 degrees. Along with the fact that I wanted
the hole in a slightly different place, so cut a new hole in a separate
plate and bolted it to the firewall with angled shims. Closing the pedal
box is non trivial - captive nuts would defiantly be the way to go.
Now the car could roll around in circles. Definite progress.
March - perhaps.
Brakes - I'm surprised that RH doesn't consider these optional.
For me fitting them was easy - no air bubbles. 14 pounds for an ezi-bleed
was one of the best investments I've made. Thanks to whoever suggested
it.
It rolls around in circles and stops!
 By
now the people that were pushing the car on all these trips were getting
restless, so the next stage was the wiring loom and engine ancillaries.
You can almost guarantee that you will do some of this in the wrong order,
installing components where you will need to drill a hole next. I think
the steering column had to come back out for the exhaust manifold. Most
of it is straight forward until you try the electrics. Of the 28lbs of
wire I started with, I think we threw away more than half. Power windows,
demister, central locking, all the warning lights telling you bulbs have
blown, various other sensors for things I don't have or check often anyway.
Cutting this lot out made the loom much easier the thread through the tiny
hole available to it, but did introduce a slew of fresh problems. More
hours of fun upsidedown in the foot well (mostly Steve - long suffering
stooge for much of this), soldering, crimping and cutting. Perhaps a week
to debug and fit the loom.
By
now the people that were pushing the car on all these trips were getting
restless, so the next stage was the wiring loom and engine ancillaries.
You can almost guarantee that you will do some of this in the wrong order,
installing components where you will need to drill a hole next. I think
the steering column had to come back out for the exhaust manifold. Most
of it is straight forward until you try the electrics. Of the 28lbs of
wire I started with, I think we threw away more than half. Power windows,
demister, central locking, all the warning lights telling you bulbs have
blown, various other sensors for things I don't have or check often anyway.
Cutting this lot out made the loom much easier the thread through the tiny
hole available to it, but did introduce a slew of fresh problems. More
hours of fun upsidedown in the foot well (mostly Steve - long suffering
stooge for much of this), soldering, crimping and cutting. Perhaps a week
to debug and fit the loom.
Starting the engine - always fun with a new engine, this time
complicated since the distributer rotor that the Harness manual described
the static timing relative to had got displaced at some point in the cars
past, so it was firing some 30 degrees out. That and the missing contact
in the new distributor cap. Soon enough though it sputtered to life with
a large group of software engineers gathered around to scare it into submission
- the car didn't know that all they could do was try and reinstall windows95
from CD.
Of course, after the rebore it soon seized. Take the plugs out, put
oil in the bores and push it round the car park, dropping the clutch in
top gear to persuade it to turn over until it smooths up again. Then of
course you have to get the excess oil out of the bores again. Man it tastes
bad. We finally had it turning over and spluttering on one, then two, finally
4 cylinders. I love the feeling I get when an engine springs back to life.
It still seems to me like magic.
 This
was the first test drive round the car park at work one lunch time. The
seats weren't yet in, the petrol tank was held in place with gaffer tape
(an improvement on the hospital drip technique I was using while starting
the car when the fuel pump wasn't working). The body has that fetching
white stripey look thanks to the plastic film protecting it. It felt such
a weird sensation driving like this - your butt inches from the floor,
and little to brace yourself against. At this stage I decided to get better
seats, because it was already apparent to me that the supplied seats gave
too little lateral support for my taste. Everything worked fine - dabbing
the brakes sends the passenger sitting on polished steel sliding into the
footwell as it should. What a feeling.
This
was the first test drive round the car park at work one lunch time. The
seats weren't yet in, the petrol tank was held in place with gaffer tape
(an improvement on the hospital drip technique I was using while starting
the car when the fuel pump wasn't working). The body has that fetching
white stripey look thanks to the plastic film protecting it. It felt such
a weird sensation driving like this - your butt inches from the floor,
and little to brace yourself against. At this stage I decided to get better
seats, because it was already apparent to me that the supplied seats gave
too little lateral support for my taste. Everything worked fine - dabbing
the brakes sends the passenger sitting on polished steel sliding into the
footwell as it should. What a feeling.
From here I'd like to say it was downhill, but there were still problems
ahead.
Like windscreen wipers. I think it took me more than a week to
cut, braze and fiddle with the sierra wipers - you need to reduce the distance
between centers by about 6 inches, cut the wiper blades down to size, extend
the spindles the wiper arms fit on etc. None of this worked first time.
The windscreen supports provide some amusement as well - curving
to fit the scuttle, twisting, bending etc. Filing and buffing them to remove
the hammer marks also takes time.
The roof, bonnet and fiberglass was quite easy, except that I
found I needed to cut a groove in the top of the rear wing to let it flex
enough to mount ok. A little ugly, but once reinforced on the inside with
more 'glass it should be OK. I also found I needed to extend the doors
with strips of stainless to improve their hinge location - and buy sturdier
hinges than came with the kit.
Fitting the new seats was more of a challenge than it should
have been. Being 6' tall I needed the seat all the way back and as low
as possible - no space for runners. I found that the position I needed
holes in to match the pre-threaded holes in the seats interfered with the
suspension mounts. Now the main 14 mm bolt that holds the rear sub frame
in has a 8 mm bolt brazed to its head. This screws into the seat first,
then slots into place in the rear suspension bushing before being clamped
from beneath with a few nuts. Not what I'd call elegant.
This was about the end of March, and the car was pretty much ready for
inspection by the powers that be. In my case this involved driving the
car to an MOT test center (with no license plates - a good insurance company
is quite understanding about this), getting the magic piece of paper (I
failed first time, but passed about 40 minutes later once the suspension
had been adjusted and a bracket for one brake pipe fixed). Then I made
an appointment with the Vehicle Registration Office - getting this proved
a little tough, since the office I should deal with was closing, the new
one wasn't taking appointments for a month or two, and a third wouldn't'
travel that far to see me. Some haggling and minor extensions of the facts
and I was inspected three days after I phoned though. Very pleasant guy,
no problems, and he didn't want to see much. He phoned me that evening
to tell me I would be able to retain the old number plates, so these were
made up, and fitted by the time his documents arrived the next day. Road
legal fun at last.
April and on.
During the build process I found the list of things to do stayed pretty
much the same length. Just the size of the tasks change to fill the gaps
as you complete things, and other possible enhancements occour. At this
stage I was pretty much down to sound deadening, carpeting, tidying the
dash, nose cone infill, rear wing beading, install the heater etc. Once
the car was on the road I found my pace slowed - I even got a social life
again and let some of the wounds on my hands heal.
These jobs are steadily getting done, but given a sunny day it is much
easier to get out and drive than it is to crawl under the car and get greasy.
Carpet and soundproofing made a big difference - and I've since filled
the gaps between the cars interior and the rear wheel wells with plumbers
foam, which has cut noise still further. The dash still has holes for instruments
I've not yet bought, and others (the clock) are not connected.
At the momment I'm working 5000 miles from the car, so the only progress
I can make is with this web page and planning.
Back to the Exmo page.